OPERATION MARKET GARDEN ENDS IN FAILURE
Berlin, Germany · September 26, 1944
On this date in 1944 the German news agency announced the surrender of 600 British troops in a small village west of Arnhem in the Netherlands. For days the lightly armed men of the British 1st Airborne Division had held the northern end of a key bridge that crossed the Dutch Lower Rhine (Nederrijn), but British armored reinforcements were not able to secure the south bank of the river. Forced to retreat under withering German assaults along the narrow and exposed 30‑mile/48‑km‑long Eindhoven-Nijmegen highway corridor (“Hell’s Highway”), the British left behind 7,000 dead, wounded, missing, or captured.
The Battle of Arnhem was part of Operation Market Garden (September 17–26, 1944), an audacious and complex Anglo-American land-airborne operation hurriedly devised by British Field Marshal (since September 1, 1944) Bernard Law Montgomery intended to outflank German forces defending the West Wall (or Siegfried Line) by crossing over 5 strategic Lower Rhine and canal bridges and thrusting into the heartland of the Third Reich—the industrial Ruhr—which was Gen. Dwight D. Eisenhower’s operational objective for the destruction of enemy forces in the West. Fresh from having taken the vital resupply port of Antwerp in Belgium, “Monty” had hugely miscalculated Allied prowess and late-war German doggedness, due partly to his most conspicuous attribute, namely his unshakeable self-confidence. The demolition of a bridge over the Wilhelmina Canal, an extremely overstretched supply line, and stiffer resistance than anticipated at the bridge at Arnhem failed to deliver a force sufficient to cross the Rhine. That river remained a barrier to the Allied advance into the German heartland until the offensives at Remagen (under Maj. Gen. John William Leonard), Oppenheim (under Gen. George S. Patton), Rees, and Wesel (both under Montgomery) in March 1945.
Market Garden blemished Montgomery’s standing within the headquarters of SHAEF (Supreme Headquarters Allied Expeditionary Forces) at least from that time on. Market Garden shattered the optimism among the Western Allies that the war in Europe was nearing an end, and it ushered in a period of stalemate on the Western Front that occasionally would inflict much pain; for example, the Battle of the Bulge during which, just among American forces, 81,000 were killed, wounded, and taken prisoner (mid-December 1944 to mid-January 1945). It was the largest and deadliest battle fought by U.S. forces in World War II. Not until late January 1945 were the Western Allies again in a position to engage the enemy in a strong, coordinated offensive along their front lines. And it was not until the end of April that the Soviet armed forces, in mortal combat on the Eastern Front, were able to drive their armored lance into the prostrate body of Adolf Hitler’s Third Reich in the European War’s last combat gasp, the Battle of Berlin.
Battle of Arnhem, September 17–26, 1944
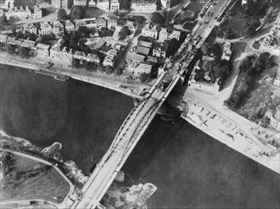 |  |
Left: Aerial view of the road bridge over the Nederrijn (Dutch, “Lower Rhine” or “Nether Rhine”), Arnhem, one of a number of choke points over water obstacles leading into Germany. British troops and destroyed German armored vehicles are clustered at the north end of the bridge. Had Field Marshal Bernard Montgomery’s ambitious scheme for seizing the road, rail, and pontoon bridges over the Lower Rhine succeeded, the war in Europe might have been shortened by months. However, backup forces were unable to come up quickly enough to enable the advance airborne troops to hold the strategically vital bridge at Arnhem.
![]()
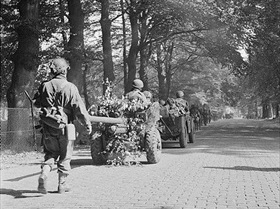
Right: The Battle of Arnhem was fought in and around the Dutch towns of Arnhem, Oosterbeek, Wolfheze, Driel, and the surrounding countryside. In this photo, men of the British 2nd Battalion South Staffordshire Regiment are shown towing a 6‑pounder antitank gun as they enter Oosterbeek en route to Arnhem, September 18, 1944. The 2nd Battalion started the operation 867 men strong but only 139 returned to British lines.
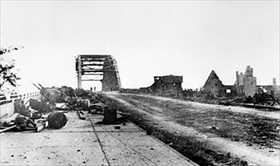 |  |
Left: The bridge at Arnhem—the “bridge too far”—after the British 2nd Parachute Battalion (745 lightly armed men) had been overrun and driven back when it ran out of ammunition following 4 days of some of the fiercest fighting seen by either side. If all had gone to plan there would have been almost 9,000 men holding the Arnhem road bridge for the 2 days it was supposed to take the British XXX Corps, 50,000 strong, to reach them.
![]()
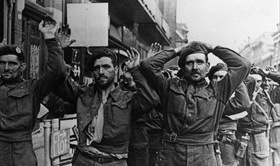
Right: British prisoners at Arnhem Bridge, September 1944. The British 1st Airborne Division, supported by men of the Glider Pilot Regiment, and the Polish 1st Independent Parachute Brigade lost approximately 1,984 killed and 6,854 captured. After 9 days of fighting, the remains of the airborne forces were withdrawn. With no secure road or rail bridges over the Nederrijn, the Allies were unable to advance further and the front line stabilized south of Arnhem. The British 1st Airborne Division lost nearly three-quarters of its strength and never saw combat again.
Interesting Rare British Footage of Operation Market Garden (Music, No Dialog)
![]()

 History buffs, there is good news! The Daily Chronicles of World War II is now available as an ebook for $4.99 on Amazon.com. Containing a year’s worth of dated entries from this website, the ebook brings the story of this tumultuous era to life in a compelling, authoritative, and succinct manner. Featuring inventive navigation aids, the ebook enables readers to instantly move forward or backward by month and date to different dated entries. Simple and elegant! Click


